In this article, I’ll try to explain what the secret ingredient is in creating an exciting and amazing sound system. For those of you who have attended the HAA HT3 Workshop or the earlier version of the HAA Level II, I don’t need to add hyperbole to my definition of “magic”. However, if you’ve not been with us during the class, allow me to explain that our results are generally amazing. This, with any combination of equipment and in a wide variety of rooms. In fact, some of the most magical moments have occurred with modest equipment and in very unlikely rooms.
Design Process
Allow me to explain the HAA design process. It must be understood that simply calibrating a room is not enough. That’s why understanding the theory and principles of proper design is imperative. HAA has developed the Acoustic Design Review (ADR) as an exhaustive way to identify design issues prior to the actual calibration. In the class, we begin with a poorly designed room and incrementally improve various aspects of the design for training purposes. In the real-world, this is not practical. The ADR is designed to be used prior to the calibration and, in a perfect scenario, prior to the room construction. This way the room is ready for the final calibration immediately after installation.
The ADR covers all aspects of the layout and zooms in on many seemingly minor misalignments. No room is perfect. Some layouts are not practical for a given scenario. For these situations, we depend on interpreting the acoustical problems present in the design flaw and identify ways to mitigate them. However, the truth is that most rooms can lend themselves to a perfect alignment and the real skill is in creating a practical way to allow the design to be perfected. Too often systems are designed with imperfections under the misguided assumption that the effect will be minor. For true “magic” we need to solve placement and acoustical issues in a way that blends into the room. What are the keys to a great design?
I won’t go into a complete explanation of the ADR here. That’s what our class is for. The real key is designing a room that is easy to calibrate. The “calibratability” of the system is an imperative. You see, if something is easy to calibrate it’s more likely that it will be calibrated and calibrated properly. The best example of this is in sub placement. There are many techniques for sub layout. The optimum scenario allows a designer to keep the room uncluttered meanwhile placing subs in the most advantageous positions. I say positions plural, because two subs are far easier to calibrate than a single sub. Most of the time we see all the effort goes in to simply get a smooth response. This misses the issue of seat-to-seat consistency. I discuss seat placement in earlier articles.
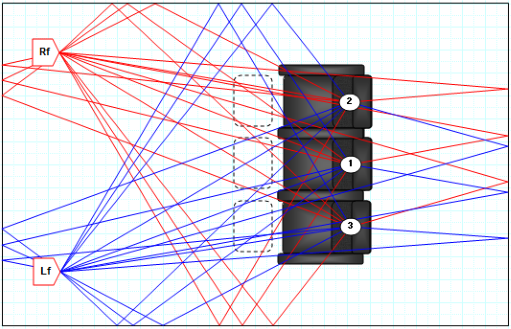
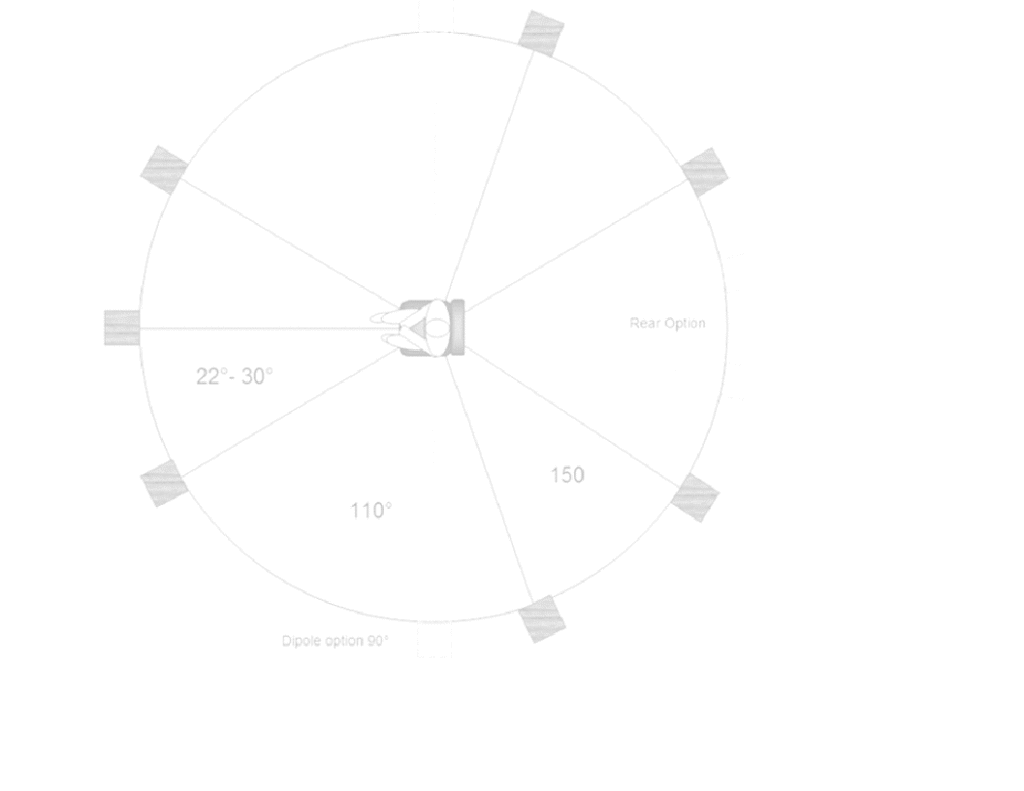
Another key element is LCR placement. In the HT3 class we use audiophile style reference material. We are listening not only to the placement of instruments in the soundstage but also for the accurate recreation of a three-dimensional soundstage consistent with the recorded event. Ignoring the system’s ability to recreate a complex acoustical space robs our listeners of another magnitude of sonic enrichment. Once we have the audiophiles in the group happy we know the system will faithfully recreate movie soundtrack with ease.
I could go on discussing each of the various elements that comprise the ADR, but the real message here is attention to detail. Each element of the system has a role in the perfection of the result. Any item that is close but not quite right is a potential point-of-failure in achieving magic.
During the HT3 workshop, each design element is changed individually then the result is listened to. We are listening to the effect of the change on sound quality but also how this change affects earlier design changes. This process of associating cause and effect is the key to creating a total design which is near perfect. Again, incrementally designing a system is only truly practical in a teaching workshop. The value of the lesson is the importance of strictly following the proper design principles and understanding the ramifications of straying from them.
Calibration Process
Calibration depends on good design. A good design makes the system more easily calibrated. Depending on the final calibration to solve design problems, even with an equalizer, is misguided. The calibration becomes more difficult and ultimately may not be properly accomplished even with automated tools.
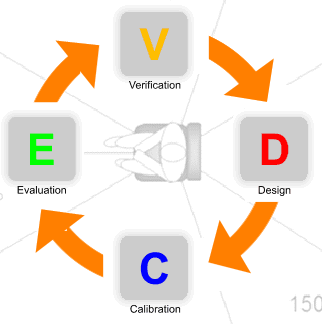
The HAA calibration process circle is shown in figure 3. The process begins with evaluating the condition of the system i.e. “look before you leap”. The Evaluation phase marks a point in time to use your professional listening skills to identify sonic problems and look to the design or calibration issues that could be the cause. An Integrator might identify “built in” issues that require more than calibration to solve. In addition, measurements are taken which can further expose the source of sonic issues. This initial step alerts us to sonic problems but further analysis is required to reveal the solutions.
Further analysis must include a thorough examination of the functionality of each component, the setup of key AVR menus and equalizers, and the general working order of the system and installation. This phase is called Verification. If you are looking for the key to great sound from me, I can’t emphasize the importance of verifying the system is working correctly. An analytical approach is required and many make the mistake of assuming that all is well. Each component must be systematically checked. Some problems are not obvious, as in a speaker wired out of polarity at the factory or a tweeter with a different response than others. These are items that often go unnoticed yet are pivotal in the process of creating amazing sound quality. It’s rare that an HT2 or HT3 class goes by without uncovering some hidden equipment problem. This phase is not optional if your quest is for amazing sound. Once you’re sure the system is properly connected, menus are correct, and everything is functioning optimally, we can begin to find correctable design problems we might have heard during the evaluation phase.
Ok, so we are talking about calibrating a system. Why is there a Design phase in the process circle? This phase is not intended for the Integrator to redesign the system. Often critical design elements like speaker position, sub position, acoustical treatment, etc. are not changeable. However, in many systems certain elements are adjustable to a limit. For those systems where a pre-calibration design review (ADR) was not completed, this may be the time to note issues that require further work beyond the scope of a calibration. A good Integrator will advise their customer as to what changes are required to make the system easier to calibrate amazing sound. In the HT3 class we have the luxury of moving speakers almost anywhere. We can play with acoustical treatment and listen to the changes. In a room with movable speakers, subs, and seats we can solve many if not most of the problems we are hearing. In a custom room where everything is tied down, we have the responsibility to identify where the design failed and offer recommendations for improvement. The goal is to make the system easier to calibrate. To make the system calibratable.
The final phase is often referred to as the “Basic Cal” in HAA circles. The Calibration phase includes the expected adjustment of time delays and speaker levels, but there is more. If an equalizer is present in the system, we’ll start with the subs and smooth out the bass. Our goal here is eliminating the blurring effect of resonance. Hopefully, we were able to make great strides on this problem during the design phase by adjusting subwoofer position and moving seats to proper areas in the room. Once completed, we can equalize the LCR speakers.
For the LCRs we need a two-pronged approach. The low frequencies of the main speakers are also prone to resonance so we deal with them differently than higher frequencies. Below ~150 Hz the dominant acoustical issue is resonance. If we equalize each speaker independently we often find that the combined response of the speakers seems to revert to an apparently non-equalized state. You see, the low frequency response of two speakers is different than each speaker individually. Therefore, we must equalize the low frequencies of the combined LCRs simultaneously with the sub (after sub EQ). Above 150 Hz (generally) we can equalize the speakers individually. Our goal in the higher range is to make each speaker’s response match the others. We can take the same approach to the remaining surround speakers but the dividends are not as great. For these speakers, matching response is usually sufficient. One word of caution. It’s important to note that acoustical distortion is generally limited to lower frequencies. Typically, we see little value in equalizing response above 300 to 500 Hz. This limit is called the transition frequency. Except for the sloping of the high frequencies, the non-EQ’d measured response is very similar to the actual response of the speaker. Why EQ it if it’s not broken?
I should add that the strategy related above is a purely “small room” approach. Small room as in most home theaters. Small room acoustics is what we do in the HAA.
For those patient enough to read this entire article on the “Magic” of proper calibration and design, you are doubtless wondering where the magic is. How do we achieve such amazing results? The answer is simple. Follow the rules and be “anal” err analytical about every detail. Don’t assume, verify. Most importantly listen. There really is no magic. It’s about trusting the rule book and examining every detail. We’ll continue to try to present articles that explain the rules, but there’s no substitute for listening. Be systematic and learn the acoustical reasons for why some systems sound amazing.