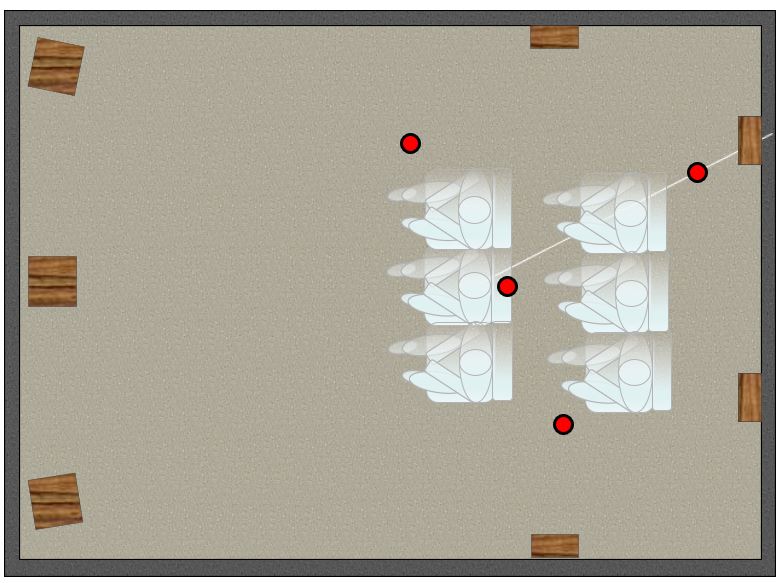
Microphone Placement
- Get your calibration kit and set up the mic stands.
- If the seats are not at 1/2 or 1/4 length and width positions, set them up in random positions within the seating area.
- Place one mic at the MLP (main listening position)
- Avoid placing any mic in a null which are located at 1/2 or 1/4 length and width positions.
- Mix up the height of each mic; avoid placing any two mics at the same height.
- Try to keep all mics away from speakers.
- If the seats are in nulls, focus mic placement on the head locations.
- Try to place the mics to avoid blocking the seat from being sat in.
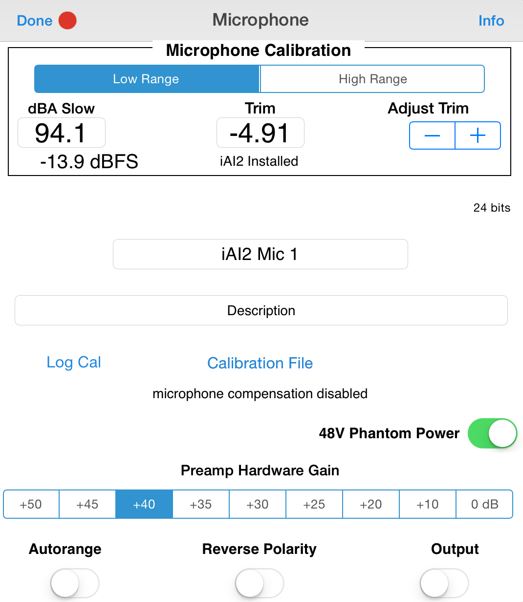
AudioTools Calibration
- Place your microphone calibrator on the MLP microphone.
- Switch it on to the 94 dB setting.
- By selecting this checklist item, the mic calibrator should already be shown.
- Make sure the 48V phantom setting is turned on.
- Adjust the Pre-amp Hardware Gain setting to show a 95 to 98 dB dBA Slow reading.
- Tap the dBA slow indicator, this will show a keyboard.
- AudioTools should have already set the level to 94 dB. Click to finish.
- This should calculate and set the required trim to show a 94 dB reading.

HAA Kit Calibration
- Power up the digital interface (Audio4C).
- Make sure all microphones are connected.
- Press the 48V button turning it green.
- Select each active microphone button (top row of buttons) to make them Green.
- This ensures each microphone is receiving the 48V Phantom voltage.
- This procedure needs to be repeated each time you power up the interface.
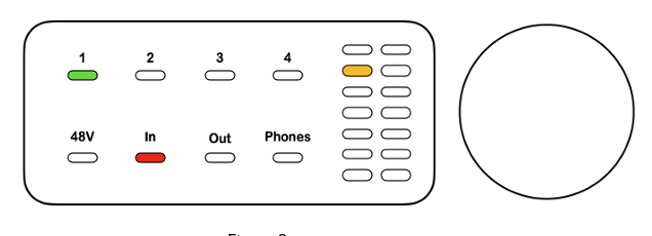
- Select the In button on the Audio4C, make sure it is Red.
- This places the Audio4C in level calibration mode.
- Select the microphone 1 button on the top row making it Green.
- Turn off all the other microphones by selecting each other top row button.
- Turn on the microphone calibrator using the 94 dB option.
- Place it on the microphone, and make sure the room is quiet.
- Connect the Audio4C to the iPad or computer using the USB cable provided.
- Open the HAA Calibration App and create a project.
- In the Evaluation Phase select Microphone Calibration.
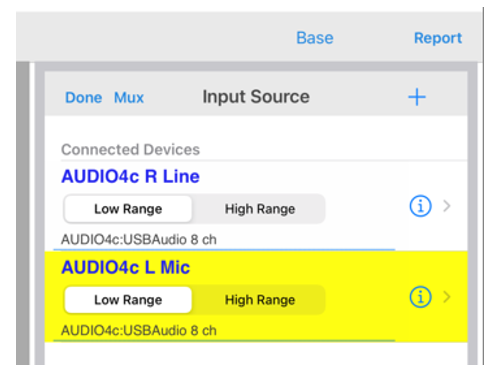
- You will know the Audio4C is connected by observing that Audio4C is listed as the connected device.
- Select the Audio4C L Mic and making sure it is set to Low Range.
- Selection is accomplished by clicking the "circle i" on the right.
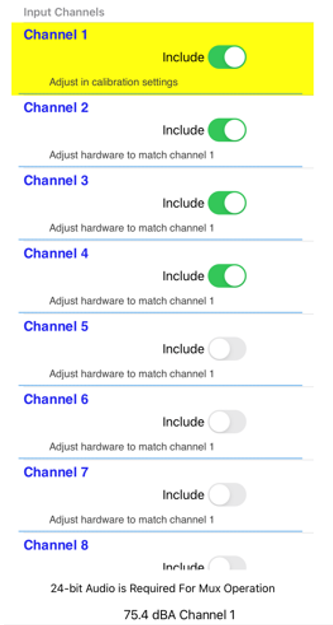
- Now you are ready to calibrate the other microphones.
- Click Done on the previous Microphone Calibration screen.
- Once your back to the input selection screen, select the Mux control above it.
- The Mux screen allows you to select other microphones.
- Turn on microphone 2 and turn off the other microphones using the Include controls.
- Go back to the Audio4C and turn off microphone 1 and turn on microphone 2.
- Make sure the In control is still Red.
- Switch the microphone calibrator to microphone 2.
- Returning to the Mux screen in the app, you should see the microphone level on the bottom of the screen.
- Use the knob on the Audio4C to adjust the level to 94 dB.
- Repeat this for all the microphones.
- When complete, press the knob on the Audio4C to save the settings.
- Select the In button on the Audio4C switching it to Green.
- All microphones are now calibrated.

